Checkboxes in Stripes and Spring MVC

When building dynamic web sites with lots of javascript UI components being created on the client, understanding how the web framework you’re using will process the request and what must be done to update fields accordingly is even more important.

Specifically, checkboxes have always been a pain to deal with. The gotcha with checkboxes are if a checkbox isn’t checked, the request doesn’t send the parameter so it requires some additional checks to detect that the user deselected something that was there to update the field accordingly. I’ve been playing around with the Stripes framework and ran into this issue.

With Stripes, you can render a checkbox using their JSP tag:

<stripes:checkbox checked="true" name="property1" value="yes"/>
<stripes:checkbox checked="true" name="property2" value="no"/>

When the “checked” value is equal to “value” value, Stripes will render the checkbox as checked. So with the code shown, two checkboxes will be shown with the first checked and the second unchecked.

If a user reverses this by unchecking the first, checking the second, and submit the form, the HTTP request will only see that property2=no. Before the form was submitted, “property1” had a value of “yes”. Now, “property1” won’t even appear in the request parameters, so we have to do special handling to check for the absent of the parameter to update “property1” to whatever value it should be when it is not checked.

In Spring MVC with form binding, checkboxes are dealt with a little differently. Using Spring MVC’s form JSP tag, you can do:

  <form:checkbox path="property1" value="yes"/>
  <form:checkbox path="property2" value="no"/>

Assuming your command bean is named “person”, this will generate the following HTML:

        <input name="person.property1" type="checkbox" value="yes"/>
        <input type="hidden" value="1" name="_person.property1"/>
        <input name="person.property2" type="checkbox" value="no"/>
        <input type="hidden" value="1" name="_person.property2"/>

As noted by the docs,

What you might not expect to see is the additional hidden field after each checkbox. When a checkbox in an HTML page is not checked, its value will not be sent to the server as part of the HTTP request parameters once the form is submitted, so we need a workaround for this quirk in HTML in order for Spring form data binding to work. The checkbox tag follows the existing Spring convention of including a hidden parameter prefixed by an underscore (“_”) for each checkbox. By doing this, you are effectively telling Spring that “the checkbox was visible in the form and I want my object to which the form data will be bound to reflect the state of the checkbox no matter what”.

Spring MVC also provides a “checkboxes” tag which allows you to render a list of checkbox boxes without having to wrap the “checkbox” tag around a JSTL forEach.

Hopefully, that gives you some insight into how to work with checkboxes in Stripes and Spring MVC.

Checkboxes in Stripes and Spring MVC

Run Firefox 2 and Firefox 3

Gah, why would you want to run both? Well, Firebug is the suck in Firefox 3. I’ve been doing a lot of javascript/ajax development lately.

When using Firefox 3 and the Firebug console, I get the following error occasionally:

commandLine.evaluate FAILS: [Exception... "Security Manager vetoed action" nsresult: "0x80570027 (NS_ERROR_XPC_SECURITY_MANAGER_VETO)" location: "JS frame :: chrome://firebug/content/commandLine.js ::  :: line 100" data: no]

Lifehacker had a nice post on how to run Firefox 2 and 3.

For most cases Firefox 3 is just fine. But for the serious javascript coder, Firebug just isn’t ready for prime time in Firefox 3.

Run Firefox 2 and Firefox 3

KML – the new mapping standard

The Open Geospatial Consortium just announced that KML has been adopted as an open standard. KML stands for Keyhole Markup Language, originally designed by Keyhole who was acquired by Google back in 2004. Keyhole’s Earth Viewer product was reborn as what we know today as Google Earth. I first came across KML when I was working on some data visualization using Google Earth. I found it to be very expressive and easy to use. You can do neat things like stream dynamic KML to animate the map or add overlays on the map.

It’s interesting to see how Google Earth/Maps’s popularity has allowed KML to become the international standard. It will be even more interesting to see how quickly the standard is adopted by many of the geo-visualization products out there. While I don’t think it will be “the HTML of geographic content“, I do think this standardization will open up the market for new products that build/support KML, pushing KML to its limits as we have done with HTML.

KML – the new mapping standard

Javascript Password Revealer using Prototype

Inspired by the latest Coding Horror post, here’s an code snippet that allows you to implement a password revealer using the Prototype JavaScript library.

Check it out in action below.


I wouldn’t mind seeing more web forms adding this feature for password fields.

Javascript Password Revealer using Prototype

Using JMeter for load testing

I came across JMeter a while back but never got a chance to try it out. From the JMeter website:

Apache JMeter is a 100% pure Java desktop application designed to load test functional behavior and measure performance. It was originally designed for testing Web Applications but has since expanded to other test functions.

This weekend I was able to test load on my 256 slice which this blog is running on. Here’s what I did:

  1. Download the binary
    You can get the binary here.
  2. Unzip the tarball/zip file
    I extracted it file to /Users/theo/tools/jakarta-jmeter-2.3.1
  3. Start up JMeter
    Go to the bin directory. Run jmeter.sh (jmeter.bat if using Windows) from the command line.
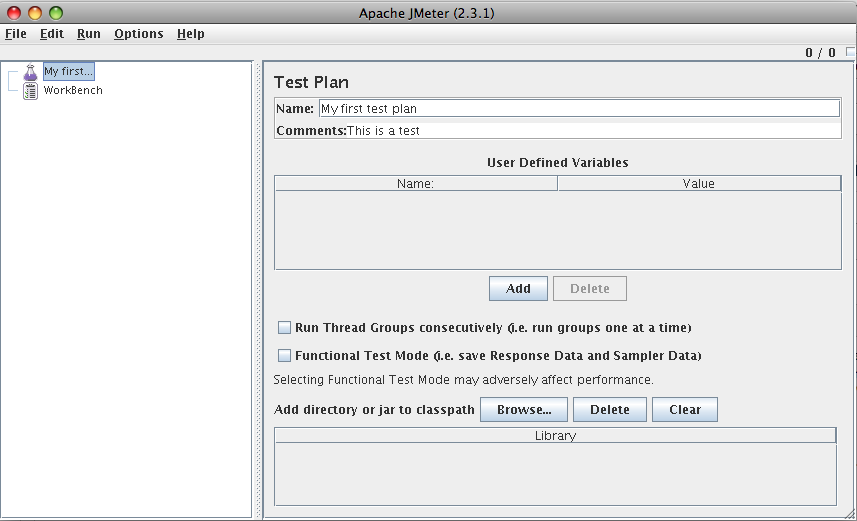
  4. Create a Test Plan
    Just give a name and any description you want for your test plan.jmeter_create_test_plan
  5. Create a Thread Group
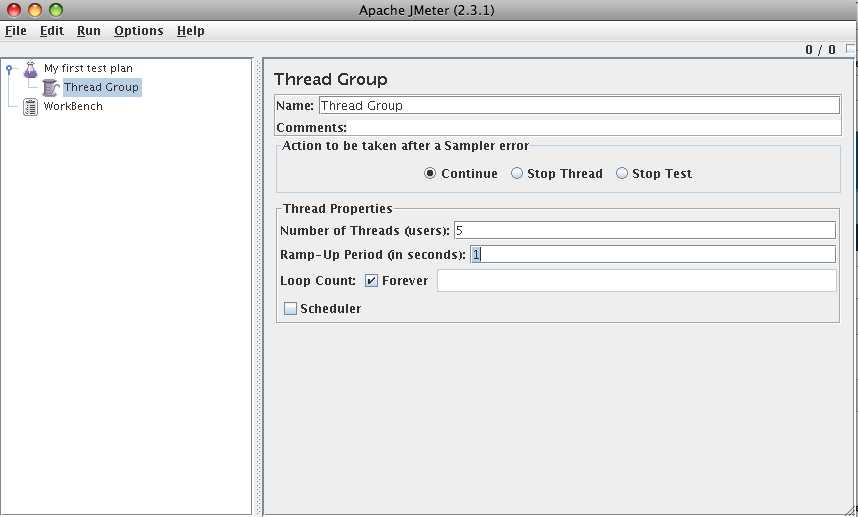
    A thread group allows you to specify the amount of load you want to simulate. Select your test plan from the left Tree view, right-click, and select Add -> Thread Group.

    Configurable fields include:

    • Number of threads – the number of connections or users you want to simulate
    • Ramp up period – the amount of time in seconds to take to reach the number of threads specified. If you choose 0, all of the threads will be created at the start of the test.
    • Loop count – you can specify to loop indefinitely or provide a number of times to run through the test.

    jmeter_create_thread_group

  6. Add a Sampler
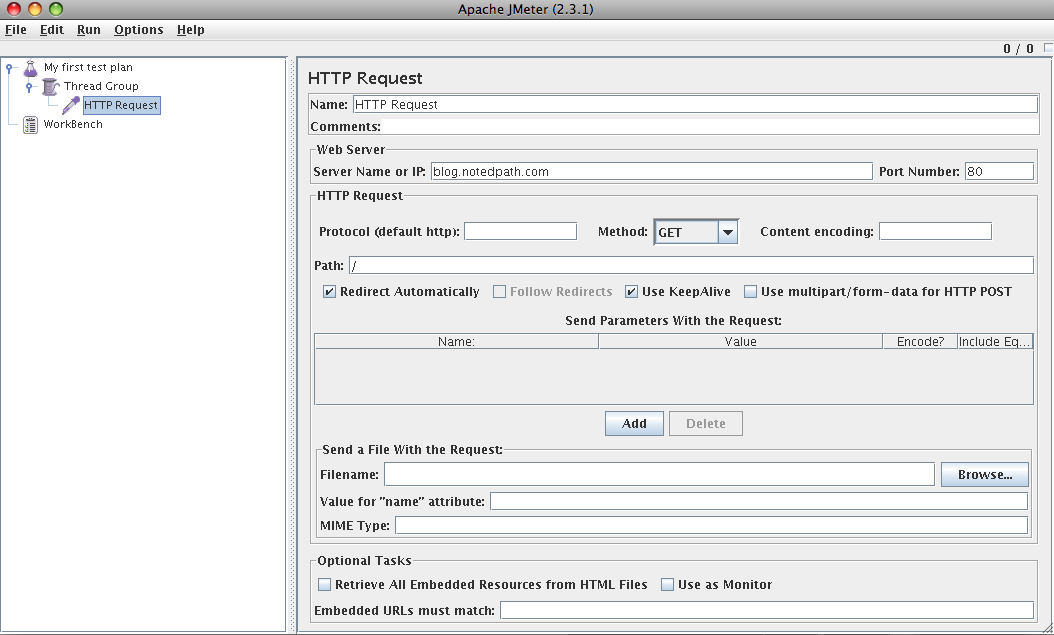
    A sampler is a type of request you want to make. In this example, I used an HTTP request to test load to a web server. It’s good to note JMeter supports multiple types of samplers including web services, JMS, and JDBC. Add a sampler by selecting the Thread Group you just created, right-click, select Add -> Sampler -> HTTP Request.

    Configurable properties include:

    • Server Name – what the ip or url is to the server the request it to
    • Port – the port the server is listening to
    • Protocol – the protocol (http, https, etc)
    • Method – HTTP method (POST,GET, PUT, DELETE, etc)
    • Path – the URL path to request

    jmeter_create_http_request

  7. Add a Listener
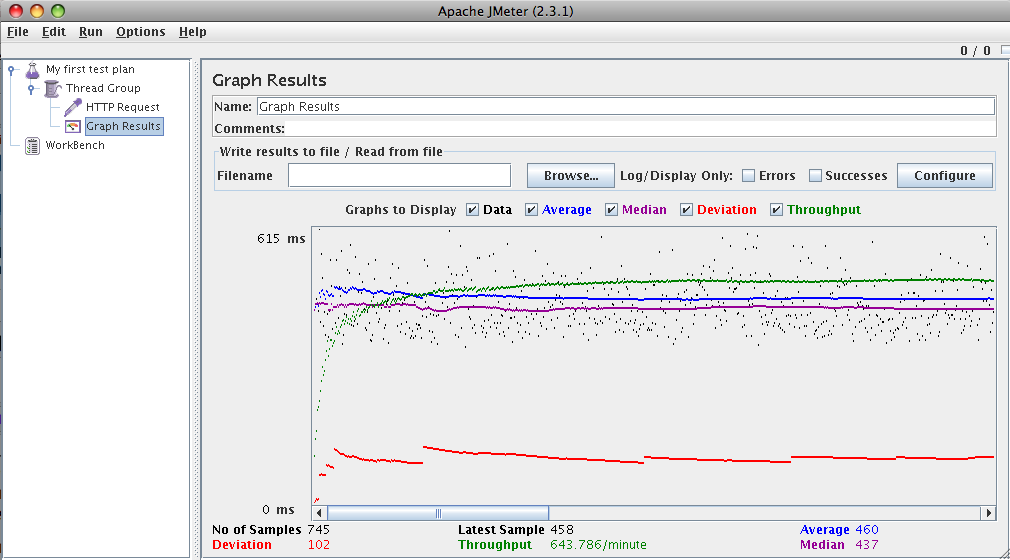
    A listener allows you to collect data points and display them in some fashion like a graph or a table. I used the Graph Results listener by selecting the Thread Group, right-click, select Add -> Listener -> Graph Results.
  8. Run the test!
    Now we are ready to run the test. From the file menu bar, select Run ->Start. You will be prompted to save your test plan. You can save it or just hit “No”. You should see data points begin to be plotted on the Graph Result or whatever listener you selected.

    jmeter_graph_results
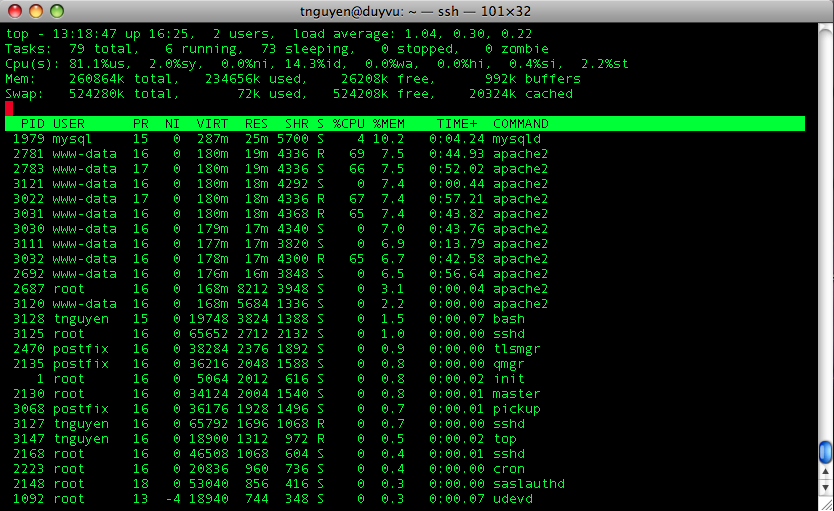
    I monitored the usage from my slice as well and this is what top showed me:

    slice_top_load_test

    You can see the 5 threads we specified in the Thread Group taking up 5 apache processes.

  9. Interpret the results
    Tests are worthless without interpreting the results. So, what the heck does this graph tell me? Pretty good documentation can be found here. Basically, given the load scenario we have setup, my slice can handle ~643 requests/minute or ~11 requests/second. I am not sure what kind of numbers I should be getting but these seem pretty good to me. One last thing to note is that JMeter is not a web browser so these metrics don’t include rendering time or execution of any JavaScript.

Overall, JMeter seems to be a great open source tool to test different kinds of load on servers. I look forward to trying it out at work. One last thing I came across is JMeter integration with your Ant build process. Check that out here. I would like to hear about other people’s experiences with JMeter, too.

Using JMeter for load testing

Dynamically targeted links

In the previous post, I quickly created a widgetized blog feed. However, the dynamically generated HTML included links that would open in the same window that the links was on. Under normal circumstances, this is the best user experience. However since Clearspring generates HTML-based feeds in an iframe, clicking on any of the links in the widget caused the page to be rendered in the small, confined space of 300×236 pixels.

I know I could have used document.getElementsByTagName('a') but I was wondering if there was a nicer way to grab all the links on a page. Googling around pointed me to this post. I can get all the links on a page by using document.links, which returns an array of the links on a page as DOM objects. I haven’t tested this on all browsers, but that’s pretty sweet.

Here’s the code in it’s entirety to make all links on a page open up in a new window:

<script type="text/javascript">
var links = document.links;
for( var i = 0 ; i < links.length ; i++ ) {
   links[i].setAttribute('target','_blank');
}
</script>
Dynamically targeted links

Fun with widgets

I came across a Clearspring back a months ago when they were TechCrunch’d and more recently, I came across Wigetized.com, made by a fellow slichoster.

I wanted to try out both and I thought it would be interesting to combine the powers of both services.

I created my widgetized blog feed from wigitized.com, created a widget cname, updated my apache2 config, created a new directory, and pasted in the generated wigetized html into a new file. Oh, and I bounced apache2.

And TA-DA! A widgetized feed!

Next step was to create a new Clearspring Widget from this. Clearspring has done a good job of making this ridiculously easy. You have a couple of options of how to create widget (flash, HTML, js, image). I went with HTML since I had HTML was just to provide the URL to the HTML and a name for the widget.

Once I had the widget added to the Clearspring platform, all I really had to do was publish it and now I have a Clearspring tracked widget.


Next, I’ll be interested in see how I can leverage the platform in different ways to make this widget “viral” and what sort of analytics come with Clearspring to help me track its viralocity (did I make that word up?).

Fun with widgets